Introduction
FortiGate firewalls are first-choice targets for attackers; these devices are widely deployed by companies and are often Internet-facing to provide services such as VPN access. Recent years have shown many critical vulnerabilities affecting this solution, some of them (e.g. CVE-2024-21762, CVE-2023-27997) allowing pre-authentication remote code execution (RCE).
That’s why FortiGate is an important subject for vulnerability researchers.
Since last year, the vendor has made several attempts to make access to its firmware internals harder by introducing several cryptographic layers. One of these layers concerns the ramdisk (rootfs) that is loaded and decrypted by the kernel at boot time. This filesystem contains all the OS binaries, including the famous init monolithic binary hosting main device features, which has been prone to vulnerabilities in the past until recently [0].
This paper focuses on rootfs decryption. The study was conducted on FortiGate 7.4.7, which was released on January 21, 2025.
Previous work
Previous studies [1] [2] have been published concerning older FortiGate versions (we advise the reader to read them before going on).
However, the documented methodologies and tools don’t work anymore:
- Interesting symbols (e.g.
fgt_verify_initrd) have been stripped (scripts are now broken) - Firmware crypto seed & derivation function have been updated
- rootfs decryption scheme has been modified (
ChaCha20AES) - Different decryption keys are now used for rootfs signature verification & decryption
Our work tends to provide a generic methodology to decrypt rootfs.
Locating the new decryption routine
Previously known decryption function, aka fgt_verify_initrd, has been heavily modified since FortiGate 7.4.3: all sub functions have been merged within a new function (RSA public key decryption & parsing, rootfs decryption, etc.) and crypto scheme has been changed. Moreover, all “fgt_*” symbols within the kernel have been removed, making it a little bit harder for the routine identification:
# diff *.symbols
...
< fgt_verifier_close
< fgt_verifier_key_iv
< fgt_verifier_open
< fgt_verifier_pub_key
< fgt_verify_decrypt
< fgt_verify_initrd
...
Several ways are possible to locate the new function in the latest firmware kernel version (flatkc) such as identifying cross-references to SHA-256 algorithm constants used by the function for ChaCha20 key material derivation. Another reliable way is finding cross-reference to rsa_parse_pub_key function. We focused on the .init.text section where the target function is located and disassemble the whole section:
$ objdump -d --section=.init.text flatkc.elf.x64.7.4.7 | egrep "rsa_parse_pub_key|push.*rbp" | grep "rsa_parse_pub_key" -B1 | head -1 | cut -d':' -f1
ffffffff8170d2b0
NOTE: flatkc.elf.x64.7.4.7 is the result of ELF transformation using vmlinux-to-elf tool.
Signature decryption
Here, we look for the prolog of a function calling rsa_parse_pub_key: this is the new decryption function. IDA Pro doesn’t identify the function by itself: once its address is located, we must force its creation.
At the beginning of the routine successive calls to unknown functions appear:
  ...
  sub_FFFFFFFF80CA455C(var_268);
  sub_FFFFFFFF80CA459E((__int64)var_268, byte_FFFFFFFF817972C5, 27LL);
  sub_FFFFFFFF80CA459E((__int64)var_268, byte_FFFFFFFF817972C0, 5LL);
  sub_FFFFFFFF80CA46AF((__int64)var_268, (__int64)v46);
  sub_FFFFFFFF80CA455C(var_268);
  sub_FFFFFFFF80CA459E((__int64)var_268, byte_FFFFFFFF817972C2, 30LL);
  sub_FFFFFFFF80CA459E((__int64)var_268, byte_FFFFFFFF817972C0, 2LL);
  sub_FFFFFFFF80CA46AF((__int64)var_268, (__int64)var_50);
  ...
First look at the sub_FFFFFFFF80CA455C reveals SHA256 algorithm standard constants:
__int64 __fastcall sub_FFFFFFFF80CA455C(_QWORD *a1)
{
  *a1 = 0xBB67AE856A09E667LL;
  a1[1] = 0xA54FF53A3C6EF372LL;
  a1[2] = 0x9B05688C510E527FLL;
  a1[3] = 0x5BE0CD191F83D9ABLL;
  a1[4] = 0LL;
  return 0LL;
}
We can safely rename these functions:
  ...
  _sha256_init(var_268);
  _sha256_update((__int64)var_268, byte_FFFFFFFF817972C5, 27LL);
  _sha256_update((__int64)var_268, byte_FFFFFFFF817972C0, 5LL);
  _sha256_final((__int64)var_268, (__int64)v46);
  _sha256_init(var_268);
  _sha256_update((__int64)var_268, byte_FFFFFFFF817972C2, 30LL);
  _sha256_update((__int64)var_268, byte_FFFFFFFF817972C0, 2LL);
  _sha256_final((__int64)var_268, (__int64)var_50);
  ...
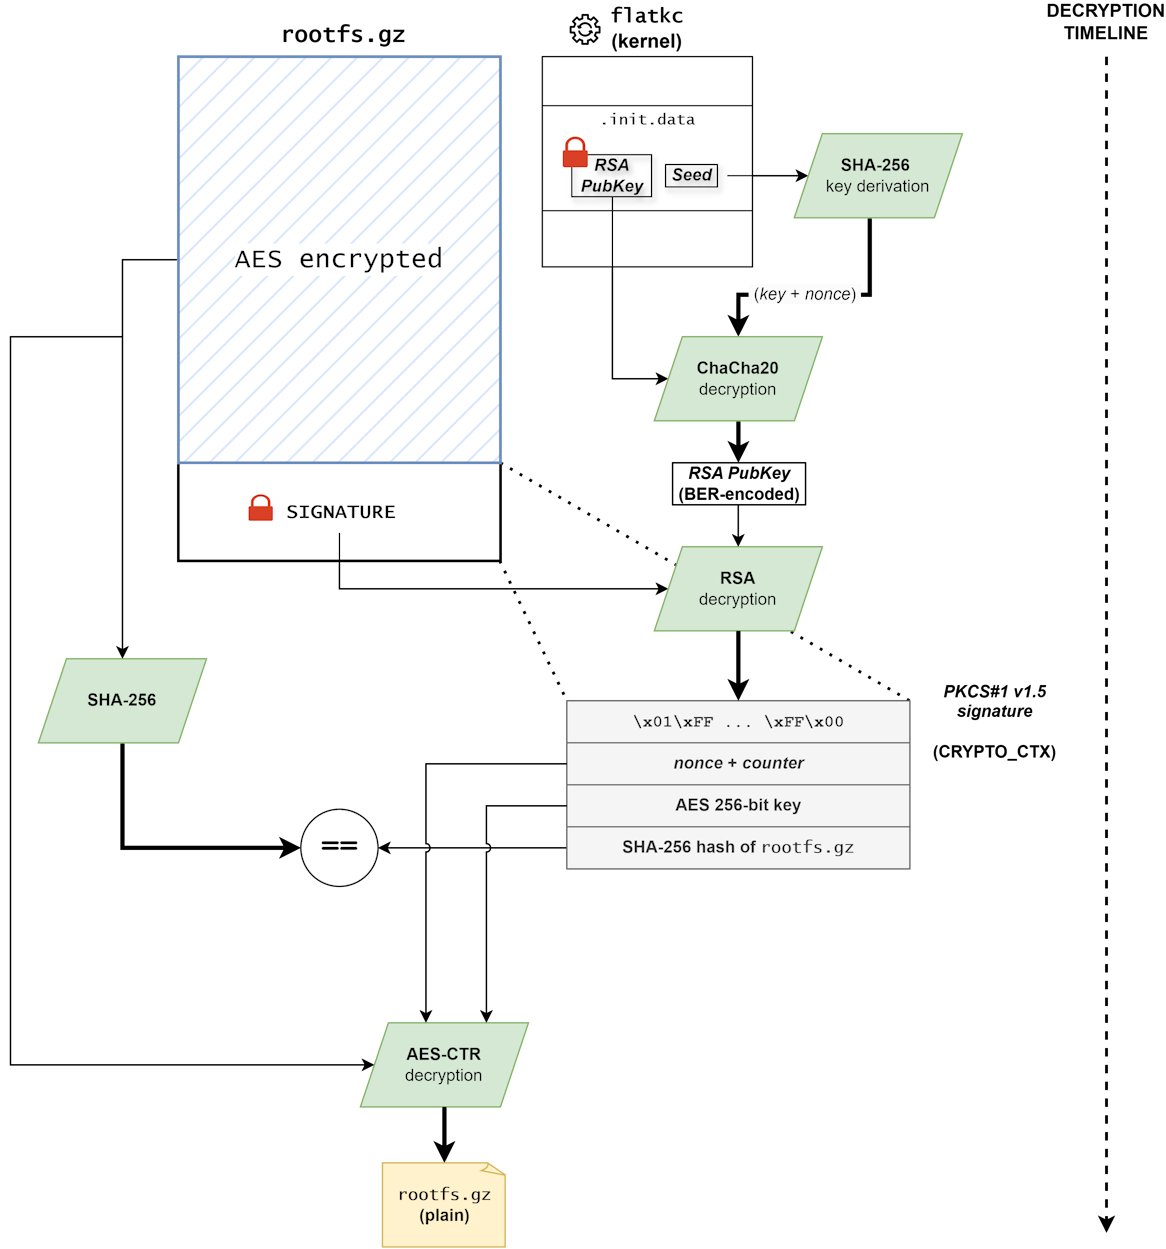
0xFFFFFFFF817972C0 is the address of what we called the “firmware seed”.
These successive hash calculations match with the previously documented [1] ChaCha20 key derivation mechanism (except for some offsets changes), this code snippet corresponds to the old fgt_verifier_pub_key function. The derived key and IV are then used to decrypt a RSA public key stored within the .init.data section (0xFFFFFFFF817971A0):
  ...
  crypto_chacha20_init(v42, &iv0, key);
  _chacha20_docrypt((__int64)v42, v6, (__int64)&unk_FFFFFFFF817971A0, 270u);
  if ( (unsigned int)rsa_parse_pub_key((__int64)asn1_pubkey, v6, 270u)
    || (pubkey.bg_e = (__int64)_mpi_read_raw_data(asn1_pubkey[1], (__int64)asn1_pubkey[9])) == 0
    || (pubkey.bg_n = (__int64)_mpi_read_raw_data(asn1_pubkey[0], (__int64)asn1_pubkey[8])) == 0
  ...
As before, the decrypted key is BER-encoded (RFC3279 [3]) and must be decoded by the kernel before being put into a structure.
We used the following structure to store the decrypted RSA public key once decoded:
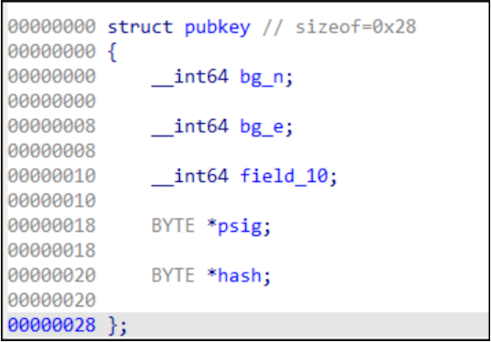
Using this key, the signature located in the last 256 bytes of rootfs.gz (__initramfs_end - 256) can be decrypted:
  ...
  bg_sig_enc = _mpi_read_raw_data((unsigned __int8 *)(_initramfs_end - 256), 256LL);   // *
  bg_sig_enc_1 = (__int64)bg_sig_enc;
  checksum = -12;
  if ( bg_sig_enc )
  {
    if ( (int)_mpi_cmp_ui(bg_sig_enc, 0LL) < 0 || (int)_mpi_cmp(bg_sig_enc_1, pubkey.bg_n) >= 0 )
    {
      checksum = -22;
    }
    else
    {
      bg_sig_dec = _mpi_alloc(0LL);
      checksum = -12;
      if ( bg_sig_dec )
      {
        bg_sig_dec_1 = bg_sig_dec;
        checksum = _mpi_powm(bg_sig_dec, bg_sig_enc_1, pubkey.bg_e, pubkey.bg_n);   // *
        ...
After modular exponentiation operation, bg_sig_dec contains the following result (more on this later):
0x01FFFFFFFFFFFFFFFFFFFFFFFFFFFFFFFFFFFFFFFFFFFFFFFFFFFFFF
FFFFFFFFFFFFFFFFFFFFFFFFFFFFFFFFFFFFFFFFFFFFFFFFFFFFFFFFFF
FFFFFFFFFFFFFFFFFFFFFFFFFFFFFFFFFFFFFFFFFFFFFFFFFFFFFFFFFF
FFFFFFFFFFFFFFFFFFFFFFFFFFFFFFFFFFFFFFFFFFFFFFFFFFFFFFFFFF
FFFFFFFFFFFFFFFFFFFFFFFFFFFFFFFFFFFFFFFFFFFFFFFFFFFFFFFFFF
FFFFFFFFFFFFFFFFFFFFFFFFFFFFFFFFFFFFFFFFFFFFFFFFFFFFFFFFFF
FF00988BA0AEB5DA6A452E809968F5076261655487820C60D573857985
065A9D2D2AA0F0E66E8755E7E577E99226EC663901B99528E3B4D97103
DE5ABA5B06675D86F3CDA1F69FF64CA20923FBA9AA660490
We recognize PKCS#1 v1.5 signature format (still as before).
The new encryption
In older versions, padding (0x01FF...00) was followed by the SHA-256 hash of rootfs encoded using BER. This signature blob was only used for rootfs integrity verification.
Now this is a custom structure composed of:
- AES CTR nonce & counter
- AES 256-bit key
- SHA-256 hash of rootfs
Some AES crypto materials have been introduced into this structure that will be later used for rootfs decryption. Indeed, the older version of FortiGate used ChaCha20: this has been replaced by the AES-CTR algorithm.
We can confirm this last statement by studying the new decryption routine. Here is the decryption code (after variables and functions renaming):
  ...
  __initramfs_start = (BYTE *)_initramfs_start;
  ramdisk_size_1 = _initramfs_end - _initramfs_start;
  ramdisk_size_remaining = ((_BYTE)_initramfs_end - (_BYTE)_initramfs_start) & 0xF;
  _AES_init((int *)ctx, (int *)key, 32);   // (0)
  p_iv_0 = (BYTE *)&counter_0;
  ctr_increment = 0;
  do
  {
    ctr_increment ^= *p_iv_0 & 0xF ^ (*p_iv_0 >> 4);   // (1)
    ++p_iv_0;
  }
  while ( v46 != p_iv_0 );
  if ( !ctr_increment )
    ctr_increment = 1;
  counter0 = counter_0;
  counter1 = counter_1;
  blk_off = 0;
  ctr_increment_1 = ctr_increment;
  do
  {
    ctr_increment_2 = ctr_increment_1;
    _w_aes_enc_blk(ctx, (int *)v46, &counter0);
    idx = 0LL;
    ctr_increment_1 = ctr_increment_2;
    do
    {
      __initramfs_start[blk_off + (unsigned int)idx] ^= v46[idx];   // (2)
      ++idx;
    }
    while ( idx != 16 );
    counter1 += ctr_increment_2;
    blk_off += 16;
  }
  while ( ramdisk_size_1 >= blk_off );
  if ( ramdisk_size_remaining )
  {
    _w_aes_enc_blk(ctx, (int *)v46, &counter0);
    v32 = 0LL;
    do
    {
      __initramfs_start[blk_off + (unsigned int)v32] ^= v46[v32];
      ++v32;
    }
    while ( ramdisk_size_remaining != (_DWORD)v32 );
  }
  ...
We first identified the __w_aes_enc_blk function by analyzing its cross-references that resolve to AES-related functions (thus the name we gave to it). At the beginning of the code snippet, we see a call (0) to a function we dubbed __AES_init, initialized with the 256-bit key extracted from the RSA-encrypted signature blob: this function is the AES key schedule.
Each block is independently encrypted by XORing (2) the plaintext block with the result of counter encryption using AES (CTR mode). The “counter” is composed of a nonce (8 bytes) and a counter (8 bytes). Here, the counter part is not incremented as usual (i.e. counter++): a strange operation (1) is first performed to calculate the increment (in our case, increment is 12).
Once the whole function is done, the rootfs is fully decrypted in memory and the result of the hash comparison (rootfs integrity) is returned by the function.
Automation
Extracting the seed
We identified a trick to retrieve the decryption routine address. We now need to find a heuristic allowing us to identify the seed address.
We previously saw that this seed is derived using SHA-256 to generate ChaCha20 key material. Code ASM reveals a recognizable pattern:
...
mov     rsi, offset byte_FFFFFFFF817972C5   ; *
lea     rdi, [rsp+3B8h+ctx]
call    __sha256_update
mov     edx, 5
mov     rsi, offset byte_FFFFFFFF817972C0   ; *
lea     rdi, [rsp+3B8h+ctx]
call    __sha256_update
mov     rsi, r13
lea     rdi, [rsp+3B8h+ctx]
call    __sha256_final
lea     rdi, [rsp+3B8h+ctx]
call    __sha256_init
mov     edx, 1Eh
mov     rsi, offset byte_FFFFFFFF817972C2   ; *
lea     rdi, [rsp+3B8h+ctx]
call    __sha256_update
mov     edx, 2
mov     rsi, offset byte_FFFFFFFF817972C0   ; *
lea     rdi, [rsp+3B8h+ctx]
call    __sha256_update
...
The idea is to disassemble key derivation routine while looking at instruction patterns “MOV RSI, OFFSET X”, with X being seed addresses in the .init.data section.
For this purpose, we used the reverse engineering framework Miasm [4]:
from miasm.core.locationdb import LocationDB
from miasm.analysis.binary import Container
from miasm.analysis.machine import Machine
import binascii

FGT_VERIFY_INITRD_ADDR = 0xFFFFFFFF8170D2B0   # hardcoded for test


def search_MOVs(reg):
    machine = Machine(container.arch)
    mdis = machine.dis_engine(container.bin_stream, loc_db=loc_db)
    asmcfg = mdis.dis_multiblock(FGT_VERIFY_INITRD_ADDR)
    all_srcs = list()
    for block in asmcfg.blocks:
        for instr in block.lines:
            if instr.name == "MOV":
                dst, src = instr.get_args_expr()
                if (dst.is_id() and dst.name == reg) and src.is_int():
                    all_srcs.append(src.arg)
    return all_srcs


loc_db = LocationDB()
container = Container.from_stream(open("flatkc.elf.x64.7.4.7", "rb"), loc_db)
seed_addr = min(search_MOVs("RSI"))
seed_data = container.executable.get_virt().get(seed_addr, seed_addr + 32)
print(f"SEED: {binascii.hexlify(seed_data).upper()}")
Result:
SEED: b'FA468F98F238DE76AC5A8B36C0EAF915E5CF1D3365E307A845A0407627A7F8A4'
This value is the beginning of the whole decryption journey.
Decrypting the RSA public key
Here again, we can use a similar technique (pattern recognition) to extract the public key.
As already mentioned, the same decryption scheme is still in use:
def derivate_chacha20_params(seed):
    sha = sha256()
    sha.update(seed[5:])   # Indexes have been modified, though...
    sha.update(seed[:5])
    key = sha.digest()
    sha = sha256()
    sha.update(seed[2:])
    sha.update(seed[:2])
    iv = sha.digest()[:16]
    return key, iv


def decrypt_rsapubkey(rsapubkey_data, key, iv):
    chacha = ChaCha20.new(key=key, nonce=iv[4:])
    counter = int.from_bytes(iv[:4], "little")
    chacha.seek(counter * 64)
    rsapubkey = chacha.decrypt(rsapubkey_data)
    return rsapubkey


key, iv = derivate_chacha20_params(seed_data)
decoded_key, _ = decoder.decode(
    decrypt_rsapubkey(rsapubkey_data, key, iv), asn1Spec=rfc3279.RSAPublicKey()
)
Decrypting the signature
The signature is encrypted with the FortiGate RSA private key. Asymmetric decryption is as simple as computing modular exponentiation using the decrypted RSA public key:
res = pow(
    int.from_bytes(rootfs_sig, "big"),
    int(decoded_key["publicExponent"]),
    int(decoded_key["modulus"]),
)
The result is a big integer we can map with a ctypes structure (crypto_ctx) for easier handling:
class crypto_ctx_ctr(ctypes.Structure):
    _pack_ = 1
    _fields_ = [
        ("nonce", ctypes.c_uint64),
        ("counter", ctypes.c_uint64),
    ]


class crypto_ctx_ctr_u(ctypes.Union):
    _pack_ = 1
    _fields_ = [
        ("ctr", crypto_ctx_ctr),
        ("counter", ctypes.c_uint8 * 16),
    ]


class crypto_ctx(ctypes.Structure):
    _pack_ = 1
    _fields_ = [
        ("padding", ctypes.c_uint8 * 174),
        ("null", ctypes.c_uint8),
        ("u", crypto_ctx_ctr_u),
        ("aes_key", ctypes.c_uint8 * 32),
        ("rootfs_hash", ctypes.c_uint8 * 32),
    ]
Decrypting rootfs
As described earlier, the RSA public key allows us to decrypt the rootfs signature and get the AES crypto material for decryption. We cannot use the conventional CTR mode with PyCryptodome due to custom counter usage, instead we must use the ECB mode to encrypt the counter and manually increment it after each block encryption:
def decrypt_rootfs(file_rootfs_dec, rootfs_enc):
    ctr_increment = 0
    for i in range(ctypes.sizeof(sig_struct.u.counter)):
        ctr_increment = (
            ctr_increment
            ^ (sig_struct.u.counter[i] & 0xF)
            ^ (sig_struct.u.counter[i] >> 4)
        )

    cipher = AES.new(bytes(sig_struct.aes_key), AES.MODE_ECB)
    blk_off = 0
    rootfs_dec = bytes()
    fd_out = open(file_rootfs_dec, "wb")
    while blk_off < len(rootfs_enc):
        keystream = cipher.encrypt(sig_struct.u.counter)
        fd_out.write(
            bytes(
                [
                    b ^ k
                    for b, k in zip(
                        rootfs_enc[blk_off : blk_off + AES.block_size], keystream
                    )
                ]
            )
        )
        sig_struct.u.ctr.counter += ctr_increment
        blk_off += AES.block_size
    ...
The whole big picture
The tool
RandoriSec provides an all-in-one Python tool [5] to decrypt rootfs.
decrypt_rootfs.py takes as input the kernel flatkc ELF binary and the encrypted rootfs.gz file:
user@randorisec:~/fortigate-crypto$ python decrypt_rootfs.py flatkc.elf.x64.7.4.7 ./vmdk/fs/rootfs.gz rootfs.gz.dec
 ____      _    _   _ ____   ___  ____  ___ ____  _____ ____
|  _ \    / \  | \ | |  _ \ / _ \|  _ \|_ _/ ___|| ____/ ___|
| |_) |  / _ \ |  \| | | | | | | | |_) || |\___ \|  _|| |
|  _ <  / ___ \| |\  | |_| | |_| |  _ < | | ___) | |__| |___
|_| \_\/_/   \_\_| \_|____/ \___/|_| \_\___|____/|_____\____|


                   https://randorisec.fr


[INFO] Retrieving crypto material...
[INFO] Decrypting ./vmdk/fs/rootfs.gz...
73822496it [00:19, 3812345.28it/s]
[INFO] DONE.
user@randorisec:~/fortigate-crypto$ file rootfs.gz.dec
rootfs.gz.dec: gzip compressed data, last modified: Mon Jan 20 18:44:06 2025, from Unix, original size modulo 2^32 119727260
user@randorisec:~/fortigate-crypto$ gzip -dc -S .dec < rootfs.gz.dec > rootfs.cpio
user@randorisec:~/fortigate-crypto/tmp$ mkdir tmp; cd tmp; sudo cpio -idv < ../rootfs.cpio
user@randorisec:~/fortigate-crypto/tmp$ ll
total 47212
drwxr-xr-x 13 user user     4096 Feb 20 13:32 ./
drwxr-xr-x  5 user user     4096 Feb 20 13:32 ../
-r--r--r--  1 root root 33109932 Feb 20 13:32 bin.tar.xz
drwxr-xr-x  2 root root     4096 Feb 20 13:32 boot/
drwxr-xr-x  3 root root     4096 Feb 20 13:32 data/
drwxr-xr-x  2 root root     4096 Feb 20 13:32 data2/
drwxr-xr-x  8 root root    20480 Feb 20 13:32 dev/
lrwxrwxrwx  1 root root        8 Feb 20 13:32 etc -> data/etc/
lrwxrwxrwx  1 root root        1 Feb 20 13:32 fortidev -> //
lrwxrwxrwx  1 root root       10 Feb 20 13:32 init -> /sbin/init*
drwxr-xr-x  5 root root     4096 Feb 20 13:32 lib/
lrwxrwxrwx  1 root root        4 Feb 20 13:32 lib64 -> /lib/
-r--r--r--  1 root root 14456836 Feb 20 13:32 migadmin.tar.xz
-r--r--r--  1 root root   549180 Feb 20 13:32 node-scripts.tar.xz
drwxr-xr-x  2 root root     4096 Feb 20 13:32 proc/
drwxr-xr-x  2 root root     4096 Feb 20 13:32 sbin/
drwxr-xr-x  2 root root     4096 Feb 20 13:32 sys/
drwxr-xr-x  2 root root     4096 Feb 20 13:32 tmp/
drwxr-xr-x  3 root root     4096 Feb 20 13:32 usr/
-r--r--r--  1 root root   148572 Feb 20 13:32 usr.tar.xz
drwxr-xr-x  9 root root     4096 Feb 20 13:32 var/
The whole filesystem is now unpacked.
Conclusion
FortiGate firmware encryption isn’t enough to prevent researchers from accessing the firmware. Several companies are working on the subject and regularly update their internal decryption tool along with new updates.
The tool we provide helps researchers at checking vendor vulnerabilities patches, binary diffing approach between versions is useful for this purpose.
We look forward to seeing new crypto updates in further firmware releases.
References
[0] https://www.fortiguard.com/psirt/FG-IR-24-029
[1] https://www.noways.io/blogs/tech/fortigate-firmware-analysis
[2] https://bishopfox.com/blog/further-adventures-in-fortinet-decryption
[3] https://datatracker.ietf.org/doc/html/rfc3279#section-2.3.1